For the demo, I made the 3 x 3 Designer Envelopes to match some little 3 x 3 cards I had made previously.
I showed these cards in this nifty little box at my Open House.


The box is made from 4 Big Shot envelope dies. I didn't do a tutorial on it, because there is a perfectly good one here, and I thank Sheryl for her easy-to-follow instructions!!

I then made these 4 little Christmas cards to go inside the box.....
Then I found this wonderful tutorial on how to make the designer envelopes. I can't remember where I saw it, but for once I saved it and I was able to show my girls - they were suitably impressed. If you would like the directions, please email me at janinpb@communitybroadband.com and I will email them to you!!
* * * * * * * * * * * * * * * * * * * * * * * * * * * * * * * * * * * * * * * * * * *
Our first project was the bookmark we made at convention. I had been so wanting to share this with my club girls.


Stamp Set: Eastern Elegance
Card Stock: Pacific Point, Old Olive Designer Prints, Whisper White
Ink: Tangerine Tango, Old Olive Craft Ink
Embellishments: Designer Brads Filigree (small and large), On Board Chipboard Something Seasonal, 20" Pacific Point 5/8" Striped Grosgrain Ribbon
We sponged Old Olive craft ink on the chipboard. We set that aside to dry. We cut two pieces of Pacific Point CS 1 7/8" square and glued them together with one end of the ribbon in between. This we glued to the back of the chipboard. We applied the Old Olive Designer Print piece cut 1 5/8" square on top of the onboard chipboard piece. We stamped the flower from Eastern Elegance and cut it out. We adhered the flower to the top along with a 1/4" circle cut from Pacific Point and the small filigree designer brad on top with a mini glue dot. We then threaded the large filigree designer brad through the other end of the ribbon and tied a knot below to keep it on. Cute bookmark!!
* * * * * * * * * * * * * * * * * * * * * * * * * * * * * * * * * * * * * * * * * * *
Our next project was a card (always have to have a card, right?) Some of the gals weren't sure about the colors, but they went along!! Thanks gals!!

Stamp Set: Cute and Curly
Card Stock: Pumpkin Pie, Regal Rose, Sweet Always Designer Papers, Pink Pirouette, Whisper White
Ink: Regal Rose
Embellishments: Boho Punch, 1/4" circlel punch, Rhinestone Brad, Top Note die, Curly Label Punch, Scallop Edge Punch
* * * * * * * * * * * * * * * * * * * * * * * * * * * * * * * * * * * * * * * * * * *
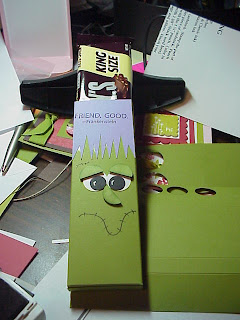
And last, but definitely not least, here's Frankie!! Isn't he just a blast? These will fit a King Size Hershey Bar!! Yummmm


There are LOTS of Frankies circulating in the stampin' world and I think they are all so cute. I saw this idea on Dawn Griffith's web, but no measurements. So I did up a tutorial so you can make one too!!
Supplies:
Stamp Set: Smarty Pants
Card Stock: Old Olive cut 6 1/2" x 7"
Lovely Lilac 2 x 2 1/2"
Old Olive 3/4" circle (2)
Whisper White 3/4" Circle (2)
Basic Black 1/2" circles (2)
Ink: Basic Black, Old Olive, Black Stampin' Write Marker
Embellishments: KING SIZED HERSHEY'S CANDY BAR

Score your 6 1/2" x 7" piece 1 1/2" and 2" and 4" and 4 1/2" on the 6 1/2" side. Turn and score at 1/2" on the 7" side

Crease all scores and then with paper snips, cut out as shown in above photo, the small 1/2" piece and the end piece including the 1/2" piece.


Turn cardstock over and decorate the middle 2" piece by cutting the Lovely Lilac with paper snips to make his "bangs" as per photo. Adhere at the top. Stamp the "Friends. Good. -Frankenstein" in basic black ink.


Punch out 2 - 3/4" circles from Whisper White and 2 - 3/4" circles from Old Olive. Cut old olive circles in half and using a sponge dauber, daube with old olive ink around each eyebrow and the nose. Adhere black 1/4" circles to eyes as per picture and eyes to cardstock. Mount eyebrows and nose with dimensionals. Add mouth with black stampin' write marker and cut above eyebrow.

Use gel pen to add lights to eyes.


Next step is to add Sticky Strip to the bottom outside and the inside 2" piece


Tear off red tape and stick together. You can cut two arrows with the My Way punch in basic gray for his bolts.

Add your candy bar and what a fun gift!!!
* * * * * * * * * * * * * * * * * * * * * * * * * * * * * * * * * * * * * * * * * * *
That's all for tonight - I'll be back soon with more cards and a fun and beautiful gift box!!


No comments:
Post a Comment