Sunday, January 13, 2008

Flip Flop Album Tutorial

I have had many requests for the flip flop album directions. So I made another one tonight and took pictures.

I have the directions (without my pictures) in a Word document and will be happy to share them - just email me

Flip Flop Album

Supplies:

4 sheets 12 x 12" plain cardstock
6 sheets 12 x 12" coordinating designer paper
Paper cutter with scoring blade
Adhesive
Embellishments

I used:
Textured card stock in Pretty in Pink and Purely Pomegranate
Berry Bliss Designer Paper Pack
Boho Blossoms Punch
Flower Fusion (felt flower pack)
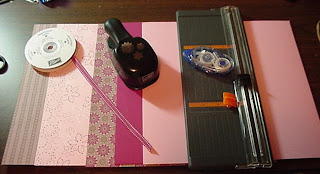


Cardstock:

Cut 3 sheets of cardstock in half 6 x 12". Set one 6 x 12" piece aside to use for cover.
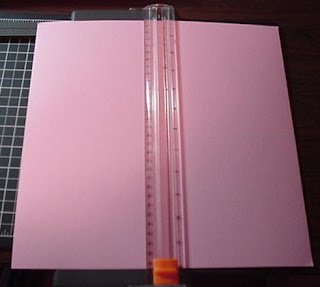


Score and Fold each of the 5 remaining 6 x 12" sheets 3" from each outside edge as shown in diagram below


Adhere these five pieces together by putting adhesive on the 3" areas as in diagram below


Designer Prints:

Sections 1, 3, and 5 will have "doors" that close like the diagram below


Cut five pieces of designer prints 5 3/4 x 5 3/4". Lay out these 5 sheets on the 6" cardstock squares; this will help you design the rest of the album. Adhere.


Cut 6 pieces of designer paper 5 3/4 x 2 3/4" for the "doors" and adhere these keeping the pattern matching.


Cut 6 additioanl designer pieces 5 3/4" x 2 3/4" for the insides of the doors. Adhere in place.


Next cut 4 pieces of designer prints 5 3/4 x 5 3/4" for the remaining 6" squares (when you fold up the album). Adhere.


Cover:

Score remaining piece of cardstock 3" from each end and again at the 2 1/2" mark. This will allow for the thickness of the book. See diagram below


Ribbon:

Open the cover and using a craft knife, make a slit in the middle of the 3" scored line wider than your ribbon as shown below:


Adhere ribbon to inside of the cover and thread through the slits to the front


To finish, adhere the book into the cover, putting adhesive only on the square of the center back.


Cut 4 pieces of designer print 5 3/4" x 2 1/4" to embellish the front cover and the insides of the cover


Embellishments:

Front Cover: Cut cardstock 4 x 3". Cut designer paper 3 3/4 x 2 3/4". Layer, Close cover. Center on cover, applying adhesive to the left side only. Embellish.

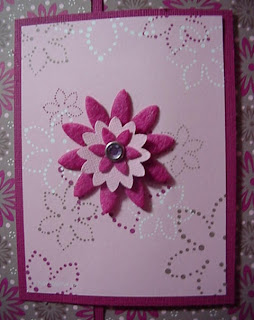


This is what the front of your album will look like when done.


Decorate inside doors same as the front


You will end up with 9 windows to place your pictures. When it's laid out flat, there will be three sections with "doors" and two sections with pictures showing. You start folding from the right and then fold in the left. Then right and left again!

Finished Album


Disclaimer: I'm VERY tired tonight, so if things aren't clear please email mail and I'll make corrections!! Thanks for your patience!!

Original directions by Ellen Smallwood
Redesigned by Jan Farring 1/2008

Friday, January 11, 2008

Boho Backgrounds

It's amazing to me how Stampin' Up is making so many things coordinate!! I'm so impressed and can't wait to use some of the new stuff I received yesterday.

Today Catherine came out and we planned for our New Catalog Workshop on the 17th.
Here she is trying to make off with "some" of my new stamp sets. Is that guilty look or what?


Here's a card we will be doing as a make and take.


Stamp Sets: Boho Backgrounds, All Holidays
Card Stock: Close to Cocoa, Pretty in Pink, Purely Pomegranate
Ink: Purely Pomegranate
Accessories: Ice Rhinestone Brad, Purely Pomegranate Double Stitched Ribbon, Round Tab Punch, Scallop Circle Punch, 1 3/8" circle punch, large and small oval punches.

We will also be making a calendar and will be demoing the new rub-ons and other new products.

Wednesday, January 9, 2008

More New Cards

Just had time for a couple of cards tonight. I tell you I LOVE our new rub-ons. They are SO fun

This first card I cased from "notimetostamp" on SCS. I changed the colors and did a few different things, but loved her idea!!


Stamp Set: A Beautiful Thing
Card Stock: Ruby Red, Whisper White
Ink: Basic Black, Ruby Red Stampin' Write Marker, White Gel Pen
Embellishments: Eastern Elegance Rub-ons, Pearls from Pretties Kit
Punches: Large and Small Oval

I rubbed the big flower on Ruby Red Card Stock and then cut it out. I outlined the flower with the white gel pen. "It's a Love Thing" is a rub-on!! So easy and simple. The little pearls in the center of the flowers really make them pop out!!

This next card is a bit busy, but when I got started, I couldn't stop!! The idea came from the Holiday Mini (remember the card we made at the Christmas Stamp-A-Stack? I used that basic idea!!)


Stamp Set: A Beautiful Thing
Card Stock: River Rock, Ginger Blossom Designer Paper, Whisper White
Ink: Groovy Guava
Embellishments: Silk flower from Pretties Kit (I sponged Groovy Guava Ink on the white petals); Pretty in Pink Brads from the Soft Subtles collection; Fire Rhinestone Brads, Eastern Elegance Rub-ons; Groovy Guava Double Stitched Ribbon

The sentiment is also a rub-on and says "You are a Breath of Fresh Air".

My first order from the new catalog is to arrive tomorrow. I can't wait......

More cards on the weekend!!

Tuesday, January 1, 2008

Happy New Year 2008

I have been having fun playing with some of the new sets from the brand new 2008 Spring and Summer Idea and Catalog. I'm SO excited to share a few of the wonderful new products we will soon be able to order (January 2nd after noon!) And you can believe I'm going to be ordering!!

I made 10 cards today - just had to share!!


Stamp Set: Embrace Life
Card Stock: Ruby Red, River Rock, Ginger Blossom Designer Paper
Ink: Basic Black, Ruby Red Stampin Write Marker
Accessories: Groovy Guava Double Stitched Ribbon, Rhinestone Fire Brad, Eastern Elegance Rub-ons (YES, these are brand new and SO fun - the words "so very very cute" are rub-ons)
Punch: Large Oval


Stamp Set: Embrace Life
Card Stock: Ruby Red, River Rock, Groovy Guava, Ginger Blossom Designer Paper
Ink: Basic Black, Cameo Coral Stampin Write Marker
Accessories: Half Pearl from Pretties Kit, Eastern Elegance Rub-ons


Stamp Set: A Beautiful Thing, Sincere Salutations
Card Stock: Whisper White, Groovy Guava, River Rock, Ginger Blossom Designer Paper
Ink: Ruby Red,
Accessories: Pretty in Pink 1/4" Grosgrain Ribbon, Eastern Elegance Rub-ons
Punch: Key Tag


Stamp Set: Fabulous Flowers, All Holidays
Card Stock: Ruby Red, Cameo Coral, River Rock, Ginger Blossom Designer Paper
Ink: Ruby Red, Basic Black
Accessories: Groovy Guava Double Stitched Ribbon, Gold Brads
Punches: Double Rectangle, Ticket Corner Punch


Stamp Set: Embrace Life
Card Stock: Taken with Teal, Pumpkin Pie, Blush Blossom, Bali Breeze Designer Paper
Ink: White Craft Ink, Taken with Teal Stampin Write Marker
Accessories: Bold Brights Brads, Ice Rhinestone Brads, Winter White Embossing Powder, Eastern Elegance Rub-On (Smile sentiment)
Punches: Photo Corner, Large and Small Oval
Technique: Stained Glass

I stamped the flowers in white craft ink and then embossed with Winter White Embosssing Powder. I then used my Taken with Teal Stampin Write Marker and colored the flower petals. On the big flower I used the same technique by stamping the flower on pumpkin pie with craft white and embossing it with Winter White Embossing Powder.


Stamp Set: Fabulous Flowers, Celebrate Everything
Card Stock: Taken with Teal, Bali Breeze Designer Paper
Ink: Taken with Teal, White Gel Pen
Accessories: Tempting Turquoise 1/4" Grosgrain Ribbon, Bold Brights Brads
Punches: Photo Corner Punch

I cut out the big flower from the Bali Breeze Designer Paper.


Stamp Set: A Beautiful Thing
Card Stock: Taken with Teal, River Rock, Bali Breeze Designer Paper
Ink: Taken with Teal, White Gel Pen, Taken with Teal Stampin Write Marker
Accessories: Tempting Turquoise 1/4" Grosgrain Ribbon, Gold Brads
Punches: Corner Rounder, Round Tab, Scallop Circle, Large Oval


Stamp Sets: A Beautiful Thing, Celebrate Everything
Card Stock: Pumpkin Pie, Taken with Teal, Bali Breeze Designer Paper
Ink: Taken with Teal, White Gel Pen
Accessories: Tempting Turquoise 1/4" Grosgrain Ribbon
Punches: Scallop Circle, 1 3/8" circle, Large and Small Oval


Stamp Sets: Big Flowers, Scatter Sunshine Jumbo Wheel, Short & Sweet
Card Stock: Almost Amethyst, Soft Sky
Ink: Almost Amethyst, Soft Sky
Accessories: Soft Sky Double Stitched Ribbon
Punches: Scallop Circle, 1 3/8" & 1 1/4" Circle, Word Window


Stamp Set: Cause for Celebration (New Level 2 Hostess Set)
Card Stock: Soft Sky, Soft Sky Designer Print Paper, Whisper White
Ink: Blue Bayou
Accessories: Soft Sky Double Stitched Ribbon
Punches: Scallop Circle, 1 3/8", 1 1/4", 1" circle punches

Wednesday, December 26, 2007

Secret Garden Simply Scrappin' Kit 80 Cards

I hope you all had a wonderful Christmas. We did, with lots of family and much much too much to eat!! But it was fun and relaxing.

My goal this year was to make cards for the girls in my family. I made 80 cards from the Secret Garden Simply Scrappin' Kit. The kits come with 8 sheets of textured cardstock, six sheets of double sided designer print paper and 6 sheets of adhesive die cuts all to match.

For these kits, you need the actual Simply Scrappin' Kit and 40 pieces of cardstock for the card bases. I used the matching card stock colors of Groovy Guava, Old Olive, Always Artichoke and River Rock. The original instructions say to make up sets of 4 cards alike, but since I like my cards different, I change each card as I go to make it a little different, but use the same layout. Since I do add a few things I would say the cost would include about 4 extra sheets of cardstock to add layering.

If you are interested in a class, I will make up instructions to fit that class. This is a wonderful way to make up cards to last a long time at a very reasonable cost. I estimated the cost of the kit and the cardstock (including shipping) and extra embellishments (ribbon, brads, etc.) to be under 50 cents per card.

Here are the 80 cards I made from the Secret Garden Simply Scrapping Kit


Monday, December 17, 2007

Criss Cross Nugget Box

I'm having fun tonight - read through my new Spring and Summer 2008 Idea and Catalog and have it all marked up!

Now I must get down to business and get my last minute gifts done.

Here's a darling little nugget box to make. It's small, but will hold about 1/2 a cup of nuts or whatever else you might want to put in it. I'm going to make one for each of the men in our family!!


I first saw this little gem on Cambria Turnbow's Blog. She made a darling box and pointed us to directions on Nichole Heady's site. Nichole has directions and a template to download to make this little jewel.

It takes one piece of 8 1/2 x 11" cardstock. Instead of stamping the cardstock, I used Close to Cocoa cardstock and added some Outlaw Designer Paper. The box measures 4 1/4" x 3". Just enough to add a little something to someone's stocking or package.

I used creamy caramel card stock and punched out with the scallop circle punch. I backed that with Chocolate Chip (round tab punch circle). I didn't have a stamp, so I printed out "Nuts For You" from my printer and then punched it out with the 1 1/4" circle punch.

I used the Round Tab Punch to make the closure for the little bag with about 1/2 cup of cashews then stapled the punch over the top with Happy Holidays from Tags on Board.

If you need a quick thank you, this would make a cute little box to hold a couple of brownies, M&M's, or even a bar of savory soap!!

That's all for tonight - I promise!!